Products
 Explore


Energy Storage Battery
Rack mounted energy storage battery 25.6V 200Ah for industry business resident solar power
Cabinet case rack mounted lifepo4 battery 51.2V 100Ah 5kWh for solar energy storage systems
Solar wind power storage systems 51.2V 14kWh 280Ah UPS EPS LiFePO4 battery UL IEC CE
Household backup LiFePo4 battery 51.2V 400Ah M91 PRO
High Voltage Storage Systems LiFePO4 Batteries 614.4 V 100 AH DSE
DSE LiFePO4 614.4 V 200 AH High Voltage Battery Storage Systems
Lithium Ion Battery 3.7V ICR14500 800mAh
First-class brands cell, and choose the best among the best.
Internal synchronization for reliability testing.
The high-precision automatic matching machine improves the consistency of the battery pack and the cycle life of the whole pack.
Fully automatic laser welding reduces the...
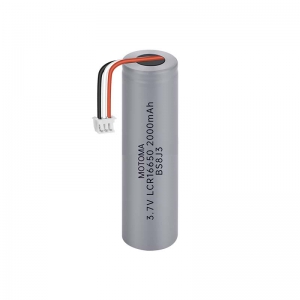
Lithium Ion Battery ICR16650 3.7V 2000mAh
First-class brands cell, and choose the best among the best.
Internal synchronization for reliability testing.
The high-precision automatic matching machine improves the consistency of the battery pack and the cycle life of the whole pack.
Fully automatic laser welding reduces the...
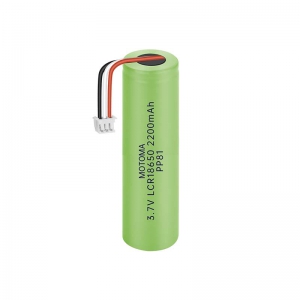
Lithium Ion Battery ICR18650 2200mAh 3.7V
First-class brands cell, and choose the best among the best.
Internal synchronization for reliability testing.
The high-precision automatic matching machine improves the consistency of the battery pack and the cycle life of the whole pack.
Fully automatic laser welding reduces the...
Lithium Ion Battery ICR18650 2500mAh 3C
A grade battery cell.
Long cycle life, high energy density, good consistency, safe.
Environment-friendly, rechargeable, no memory effect.
Fully automatic laser welding reduces internal resistance of battery pack.
Customized design service of BMS, support intelligent communicat...
Lithium Ion Battery ICR18650 2600mAh 3C
First-class brands cell, and choose the best among the best.
Internal synchronization for reliability testing.
The high-precision automatic matching machine improves the consistency of the battery pack and the cycle life of the whole pack.
Fully automatic laser welding reduces the...
Lithium Ion Battery ICR 18650 3200mAh 3.7V
First-class brands cell, and choose the best among the best. robot vacuum cleaner battery.
Internal synchronization for reliability testing.
The high-precision automatic matching machine improves the consistency of the battery pack and the cycle life of the whole pack.
Fully autom...
Ultra Thin Lithium Polymer Battery 0.9mm
Ultra-thin design.
High energy density.
Long lifespan.
Excellent safety.
Battery Chemistry: Lithium Ion Polymer
Battery Terminations: PC Pins (Horizontal) / (Vertical), SMT (SMD) Mount, Solder Tabs, Wires, Cables with Connectors.
Battery Customizing: Custom design shap...
LiPo Battery 3.7V Ultra Thin 120mAh
Ultra-thin design.
Nominal Voltage: 3.7 V
Nominal Capacity: 120 mAh
High battery consistency
Low internal resistance
Sufficient battery capacity
Outstanding cycle life
Battery Chemistry: Lithium Ion Poly
Original lipo battery factory from raw material to batter...
3.7V Ultra Thin LiPo Battery 80mAh
Ultra-thin design.
Nominal Voltage: 3.7 V
Nominal Capacity: 80 mAh
Low internal resistance
Sufficient battery capacity
Outstanding cycle life
Optimized PCM design
In series connection or in parallel connection is allowed
Excellent safety.
Battery Chemistry:...
3.7V Fast Charging Lithium Battery 720mAh
Nominal Voltage: 3.7 V
Nominal Capacity: 720 mAh
Working temperature range: -20℃ ~ +60℃
High battery consistency
Low internal resistance
Sufficient battery capacity
Outstanding cycle life
Battery Chemistry: Lithium Polymer
Battery Terminations: PC Pins (Horiz...
3.85V Fast Charging LiPo Battery 110mAh
Nominal Voltage: 3.85 V
Nominal Capacity: 110 mAh
Working temperature range: -20℃ ~ +60℃
Battery Chemistry: Lithium Ion Polymer
High battery consistency
Low internal resistance
Sufficient battery capacity
Outstanding cycle life
Battery Terminations: PC Pins (...
Fast Charging Lithium Polymer Battery 2C 5C
2C~5C fast charging battery.
Charge 70% capacity in very short time.
Long cycle life.
Good consistency, low self-discharge.
None-memory li poly battery.
Excellent safe, environment-friendly.
Battery Chemistry: Lithium Ion Polymer
Battery Terminations: PC Pins (Hori...
3.7V High Density LiPo Battery 1500mAh
Nominal Voltage: 3.7 V
Nominal Capacity: 1500 mAh
Working temperature range: -20℃ ~ +60℃
High battery consistency
Low internal resistance
Sufficient battery capacity
Outstanding cycle life
Battery Chemistry: Lithium Ion Polymer
Battery Terminations: PC Pins (...
11.1V High Density LiPo Battery 2000mAh
Nominal Voltage: 11.1 V
Nominal Capacity: 2000 mAh
Working temperature range: -20℃ ~ +60℃
Sufficient battery capacity
Outstanding cycle life
Optimized PCM design
In series connection or in parallel connection is allowed
Battery Chemistry: Lithium Ion Polymer
...
3.8V High Density LiPo Battery 1300 mAh
Nominal Voltage: 3.8 V
Nominal Capacity: 1300 mAh
Working temperature range: -20℃ ~ +60℃
Excellent safe
Small and light-weight
None-memory battery
Environment friendly battery
High battery consistency
Battery Chemistry: Lithium Ion Polymer
Battery Termina...
3.7V LiPo Battery High Density 7500mAh
Nominal Voltage: 3.7 V
Nominal Capacity: 7500 mAh
Working temperature range: -20℃ ~ +60℃
Excellent safe
Small and light-weight
None-memory battery
Environment friendly battery
Optimized PCM design
In series connection or in parallel connection is allowed
...
3.7V Lithium Polymer Battery High Density 900mAh
Nominal Voltage: 3.7 V
Nominal Capacity: 900 mAh
Working temperature range: -20℃ ~ +60℃
Low internal resistance
Sufficient battery capacity
Outstanding cycle life
Optimized PCM design
In series connection or in parallel connection is allowed
Battery Chemistry...
LiPo Battery High Density 3.7V 6000mAh
Nominal Voltage: 3.7 V
Nominal Capacity: 6000 mAh
Working temperature range: -20℃ ~ +60℃
High battery consistency
Low internal resistance
Sufficient battery capacity
Outstanding cycle life
Battery Chemistry: Lithium Ion Polymer
Battery Terminations: PC Pins (...
Rack mounted energy storage battery 25.6V 200Ah for industry business resident solar power
Rated Power 25.6 V 200 AH (5.12 KWH)
Made By Fresh Grade A Cells
>6000 Cycles @DOD 80%
Intelligent BMS With Advanced Software Improves Performance
Support Parallel Up to 15 Batteries
Max Charging and Discharging Current 150A
Screen For Real-Time Monitoring
Commu...
Cabinet case rack mounted lifepo4 battery 51.2V 100Ah 5kWh for solar energy storage systems
Rated Power 51.2 V 100 AH (5.12 KWH)
Made By Fresh Grade A Cells
>6000 Cycles @DOD 80%
Intelligent BMS With Advanced Software Improves Performance
Support Parallel Up to 15 Batteries
Max Charging and Discharging Current 150A
Screen For Real-Time Monitoring
Commu...
Solar wind power storage systems 51.2V 14kWh 280Ah UPS EPS LiFePO4 battery UL IEC CE
Rated Power 51.2 V 280Ah (14.336 KWH)
Made By Fresh Grade A Cells
7 Years warranty
>8000 Cycles @DOD 80%
Intelligent BMS With Advanced Software Improves Performance
Support Parallel Up to 15 Batteries
Max Charging and Discharging Current 200A
Screen For Real-Tim...
Household backup LiFePo4 battery 51.2V 400Ah M91 PRO
Rated Power 51.2 V 400 AH (20.48 KWH)
Made By Fresh Grade A Cells
>8000 Cycles @DOD 80%
Intelligent BMS With Advanced Software Improves Performance
Support Parallel Up to 15 Batteries
Max Charging and Discharging Current 200A
Colorful Touch Screen With English, Arab...
High Voltage Storage Systems LiFePO4 Batteries 614.4 V 100 AH DSE
Rated Power 614.4 V 100 AH (61.44KWh)
Made By Fresh Grade A Cells
>6000 Cycles @DOD 80%
Intelligent BMS Improves Performance
Support Parallel Up to ? Batteries
Max Charging and Discharging Current 50A
Screen For Real-Time Monitoring
Communication:CAN/RS232
SKU...
DSE LiFePO4 614.4 V 200 AH High Voltage Battery Storage Systems
Rated Power 614.4 V 200 AH (122.88KWh)
Made By Fresh Grade A Cells
>6000 Cycles @DOD 80%
Intelligent BMS Improves Performance
Support Parallel Up to ? Batteries
Max Charging and Discharging Current 100A
Screen For Real-Time Monitoring
Communication:CAN/RS232
S...
Solutions
Solutions